How to Start a Blog – The Definitive Guide for Beginners
Thinking about starting a blog? Whether you want to blog for fun or blog for your business (because blogging is content marketing 101, yo!), everyone starts out with the exact same basics you’re going to ready about in this post.
I’m going to show you the exact steps you need to follow to set up a blog, no technical skills required.
Don’t worry—I’ll walk you through every step with lots of screenshots and answer all your questions in the comments.
Why should you take my advice? Because I’ve been blogging for 15 years. I started back in 2003 when LiveJournal was a thing, then switched to WordPress in 2005. Back then, most people wrote blogs like diaries, so that’s exactly what I did, too!
But around 2007 I started building WordPress websites for friends and family, and then for non-profits, before getting a job in content marketing for a web development company.
Last year, I finally made the jump to working for myself as a full-time blogger, writing professionally for a variety of different websites. I get paid to blog and I love it!
But my journey to this point has involved a heck of a lot of work, mistakes, and figuring stuff out on my own. This is the blog post I wish I had when I started blogging 15 years ago.
Let’s get started!
The Basic Steps to Starting a Blog
Setting up a blog in 2022 is sooo much easier than it was back in 2003, believe me! It’s not difficult at all to set up a website from scratch, even with no tech know-how.
There’s no coding or complicated stuff required. In fact, if you follow this guide exactly, you’ll have your own blog set up in under 30 minutes! Pretty cool, right?
Here are the basic steps that you’ll follow:
- Decide What You Want to Blog About
- Choose a Blogging Platform
- Choose a Web Host and Domain
- Set Up WordPress
- Start Using Your Blog (we’ll break this into a few sections to make it easier to follow)
Just a quick note: This guide isn’t about using WordPress.com. Yes, it’s one way to start blogging, but it’s also severely limiting. So in this guide, I’m going to show you how to start blogging on your very own website using self-hosted WordPress. This is the approach I recommend to everyone who wants more control over how their blog looks and works.
Why Start a Blog?
Before we dive into the tutorial for starting your blog, let’s back up a minute because I’m interested to know one question: Why do you want a blog?
At its heart, blogging is about sharing your knowledge with the world. It’s important to blog about what you are passionate about, whether it’s crochet, tips for winning Agricola, scoping out the best brunch spots in your city, or smashing your competition with content marketing. Because when you write with passion, your readers are going to love reading your blog posts.
Here are some of the most popular reasons why people start a blog:
- To make money. Money makes the world go round, right? I make a full-time income from blogging and so do many others—and you can too! The top bloggers in the world earn a lot of money. It takes a lot of work, writing, and dedication, but it’s also easy to get started—all you need is a blog and you can get one just by following this guide!
- Share your story. Having a blog gives you a platform to voice your thoughts and opinions and share your story with others around the world. Many bloggers use their blogs as a diary where they write about their daily lives and experiences.
- Get exposure for your business. A blog can give you and your business—no matter how big or small it is—the platform it needs to reach large numbers of potential customers for very little cost. This is known as content marketing. Many people who are experts in their fields blog as a way to share their knowledge and demonstrate thought leadership.
- To become a published author. If you’re a writer, starting a blog is a great first step towards becoming a published author. Blogging gives you a place to write, share your work, and build a community of readers eager to buy your books once they’re published.
- To connect with others. Perhaps one of the most amazing things about blogging is that it lets you connect with other like-minded bloggers all over the world. No matter what your interests are, there are blogging communities online for people just like you.
Step 1: Decide What You Want to Blog About
So, what do you want to blog about?
If you run a business, you should blog about the topics that your customers would be interested in. Even if you don’t post directly about your products, by creating content that your target customers want, you can get them to learn about your brand.
If you’re writing for yourself, you can be more creative with your blog and what you share. Here are a couple of tips to keep in mind:
- Blog about what you love. It’s more likely you’ll want to actually write (and your blog will last longer than a week) if your blog is about a topic you’re passionate about. The best blogs are written with passion and enthusiasm—no one wants to read a boring blog!
- Blog with a unique angle. Thinking about starting a blog about vegan cooking? Consider this: When you google “vegan cooking blog” there are 260,000,000 results. That doesn’t mean you can’t create a successful vegan cooking blog – it just means that you need to find a unique angle to help yourself stick out.
No matter what you choose to blog about, you probably won’t be the first person to do it (and if you are, nice work!). But don’t let this put you off! Think about how you can approach your chosen topic from a fresh angle. Ask yourself, “how can I make my blog better than all the others?”
Whether you’re writing for your business or for yourself, your goal for your blog should be to become the go-to resource for your topic. This means sticking to your topic, blogging regularly, and establishing yourself as an authority.
Step 2: Choose a Blogging Platform
There are a ton of different blogging platforms such as Squarespace, Wix, Weebly, Joomla, and Drupal, among others. There are also new tools coming out such as Substack.
But I’m going to make it easy for you: Just go with self-hosted WordPress.
If 15 years of blogging has taught me anything, it’s that WordPress is the best tool—hands down—for blogging. Whether you’re a beginner who’s starting a blog for the first time or a business owner who wants to take content marketing seriously, WordPress has all the tools you need to create an amazing blog and even make money with it.
I used and recommend self-hosted WordPress.
Basically, there are two types of WordPress:
- WordPress.com – This option is free but you’re limited to what you can customize.
- WordPress.org – Also known as “self-hosted WordPress,” this option costs a few bucks a month but gives you so much more control over what you can do with your blog. With a self-hosted WordPress blog, you can customize your site all you like and increase your earning potential.
I can guarantee you, even if you start with some other blogging tool, you’ll eventually end up using WordPress, just like 96% of all the bloggers in the Top 1 Million websites.
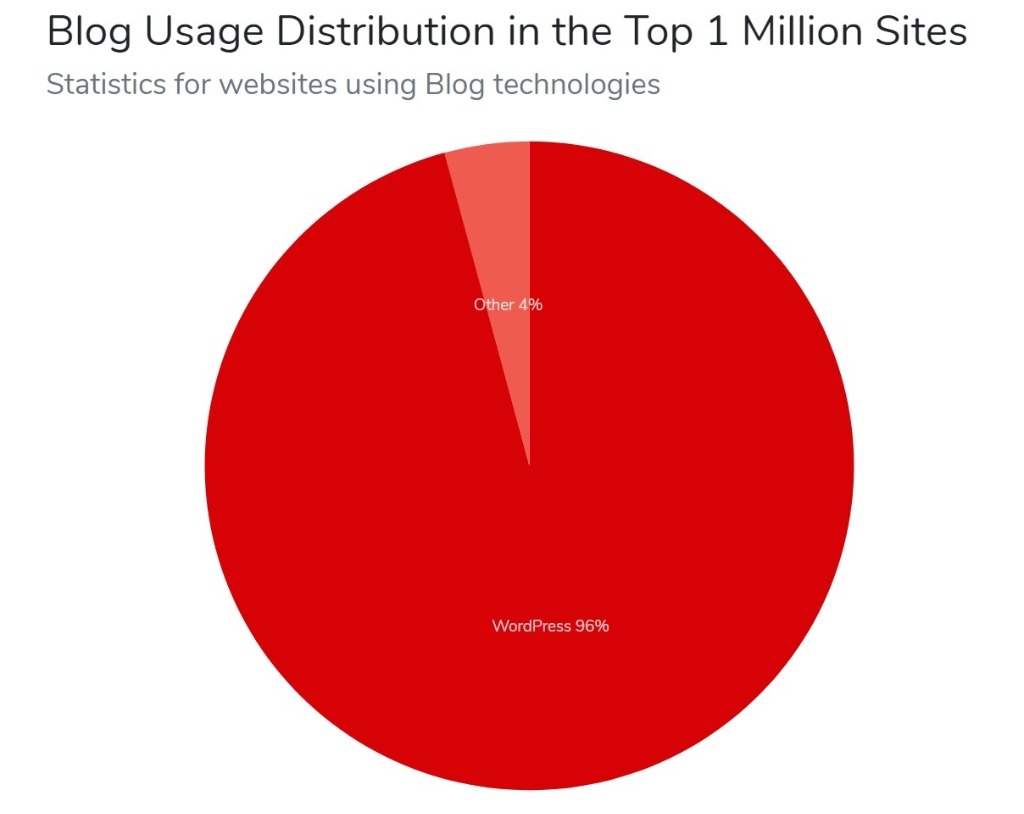
What’s more, more than 40% of all websites are powered by WordPress, which is just an incredible number.
Beyond being used by virtually every successful blogger, self-hosted WordPress is a great decision because:
- It’s easy to set up, as I’ll show you in this guide.
- You can control how your blog looks and add new features without needing any special technical knowledge.
- There are lots of resources to help out when you get stuck and when you want to customize your site.
- It’s scalable, i.e. if you wanted to, you could start a small blog and grow it into a global publishing company. WordPress can do just about anything!
- Self-hosted WordPress is free! There are a few costs beyond the WordPress software, but you’ll still be able to run your blog for well under $100 for an entire year.
👉 Learn more about what WordPress is
Time to start setting up your WordPress blog!
Step 3: Choose a Web Host and Domain Name
First things first: you need to choose a web host and a domain name.
What’s a web host? Basically, when you set up a blog it needs to live somewhere on the internet. And that somewhere is a web host. Web hosts provide server space (i.e. hard drives) that can store the files that make up your blog so that it can be accessible to anyone using the web.
Then, your domain name is basically your blog’s permanent address on the Internet. It’s what connects your visitors to your web hosting. For example, this blog you’re reading now is theavdesigns.com.
You might want to use your name, business name, or something catchy and memorable. Only one person can own a domain name at a time, so you’ll need to check whether or not your idea is available. For example, you can’t go out and register facebook.com because it’s already taken! To check if a domain name is available, you can use Instant Domain Search.
You’ll be able to register your domain name from your web hosting company during the signup process, which makes everything simple and non-technical. Better yet – if you use the web hosting company we recommend, you’ll get your domain name for free!
With that being said, there are lots of web hosting companies and choosing one can be overwhelming.
We personally recommend Bluehost because they’re affordable and they make it super easy and non-technical to create your blog, which is great when you’re a beginner.
With Bluehost, you can have your WordPress blog up and running in no time without ever encountering anything complicated or technical.
To get set up with Bluehost:
- Go to the Bluehost website.
- Choose a hosting plan for your site. Bluehost offers three different hosting plans to suit blogs of all shapes and sizes. If you’re not sure where to start, the Plus plan is a great option because it gets you more storage and lets you host unlimited sites. The Choice Plus is also a good option if you want automatic backups. However, if your budget is tight and you know you only want to make a single blog, the Basic plan is totally fine to start:

- On the next screen, you’ll be asked to enter your domain name. Again, Bluehost gives you a free domain name for your first year, which is another nice bonus.
If you already have a domain name, you can also choose that option instead and enter your details.

For this tutorial, I’m going to select “Create a new domain name” If you’re setting up an existing domain, no worries! The process moving forward is almost the same so you can continue following these instructions.
Click Next to continue.
- Lastly, you’ll be asked to enter your billing details and choose the length of your billing term. You’ll get the best price if you pay for three years upfront, but you can also just pay for one year if you don’t want to commit for three years. For one year of hosting on the Plus plan, you’ll pay $83.40.

Bluehost will also try to encourage you to pay for Package Extras. However, you don’t really need any of these services to make a blog, so feel free to uncheck all of those options to save some money:

Once you’ve made all those choices, click the Submit button to finalize the process and create your Bluehost hosting account. Now, you’re almost at the point where you have a working blog!
Step 4: Install WordPress Using Bluehost’s Tool
Now, you’re ready to install the actual WordPress software on your Bluehost hosting, which means you’ll have a basic working blog in just a few minutes.
Bluehost makes installing WordPress super easy. After you create your account, you should be prompted to set up a new website. Or, if you don’t see the WordPress installer wizard, you can always access it by going to the My Sites area in your Bluehost dashboard and clicking the Add site button:

In Bluehost’s Create a new WordPress site setup wizard, you’ll want to enter the name and tagline for your blog. Don’t worry – you can always change these later, so you don’t need to stress right now.
You should also click the Advanced button to expand the options to add information for your WordPress account. You’ll use these account credentials to log in to your WordPress dashboard, which is where you’ll actually manage your blog’s content, design, features, and more.
Make sure to choose a strong password and keep it somewhere secure (like a password manager) because you’ll need it in the next steps:

Once you enter your email and password, click Next to advance.
Now, you’ll need to choose the domain name where you want to install the WordPress software. You should only have one domain name right now, so you can leave it as the default. You should see the free domain name that you chose when you signed up for Bluehost in the previous step. Don’t enter anything in the Directory field – just leave that part blank.
Bluehost will also suggest installing some free plugins. We recommend unchecking all of these boxes for now. If you decide that you do want one of these plugins in the future, you can always install them later on (we’ll cover plugins later in this tutorial):

Then, click Next to continue.
Now, you’ll need to wait about 30 seconds while Bluehost sets up WordPress for you. Once the process finishes, you should see a success screen:

To log in to your brand spankin’ new blog, go to yoursite.com/wp-admin. For example, if your domain name is coolblog.com, you would go to coolblog.com/wp-admin (Bluehost will show you the exact URL in the Admin field of the success screen). There, you can log in using the email and password that you entered a moment ago.
Once you log in, you’ll see the WordPress dashboard, along with a welcome screen from Bluehost:

❗ By default, Bluehost will hide your blog from anonymous visitors while you work on it. When you’re ready to make your blog public, you can come back to this screen (by clicking the Bluehost option in your WordPress dashboard’s sidebar) and click the Launch your site button.
Now, you’re ready to really make your blog your own!
Step 5: Choose Your Blog’s Theme
Your WordPress “theme” controls how your blog looks. You can think of it kind of like your blog’s clothing – changing your WordPress theme won’t delete your posts or mess with any of your data – it will just change how everything looks to your visitors.
You’ll want to choose a theme that matches your blog’s niche and aesthetic, which is pretty easy because you can find thousands of free and premium themes. For example, if you’re making a food blog theme, you can find dedicated WordPress themes for food blogs. The same is true for travel blogs, fashion blogs…pretty much any topic.
Where to Find Themes for Your Blog
To find the best WordPress themes, you have a few options:
- Search for free themes at WordPress.org – this is the official theme directory. As of January 2022, you’ll find over 9,000 free themes.
- Browse our theme collections – we make lists of the best themes for specific niches. For example, the best food themes.
- Search for premium themes at ThemeForest – ThemeForest is a popular directory of premium themes. Typically, you’ll pay around ~$60 for a theme from ThemeForest.
- Use Google – Google can be a great resource here – just make sure that you only pick themes from established shops and don’t use sketchy download sites.
If you’re not sure where to begin, the free Astra theme is a great place to start. It’s a multipurpose theme, which means you can use it for pretty much any type of blog. It also has pre-built demo sites for tons of different niches, like food blogs and fashion blogs.
The great thing about those demo sites is that you’ll be able to edit them using a visual drag-and-drop interface (more on that when we talk about plugins in a little!).
How to Install Your WordPress Theme
Once you’ve chosen the perfect theme for your blog, you can install it by going to Appearance → Themes in your WordPress dashboard:
- If you found your theme at WordPress.org, click on the WordPress.org Themes option and then search for your theme by name to install and active it.
- If you purchased a premium theme, you’ll need to upload the zip file by clicking the Upload button.

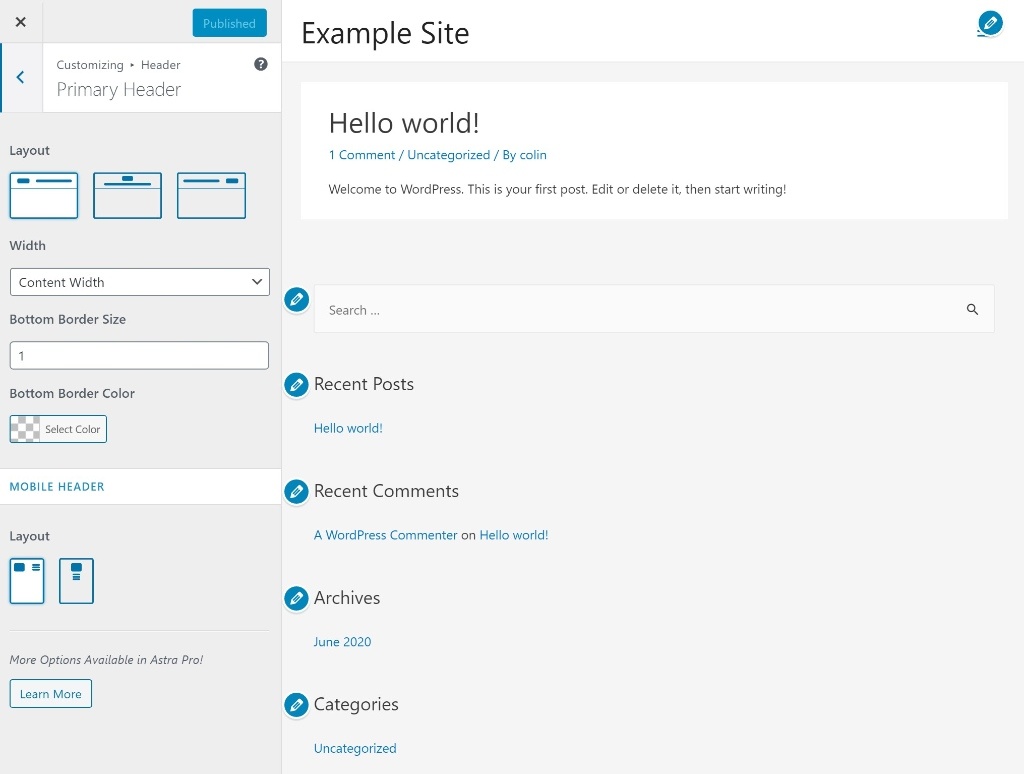
How to Customize Your Theme
Once you’ve installed and activated your theme, you can go to Appearance→ Customize to make it your own. This will launch the real-time WordPress Customizer. You’ll see a list of options in a sidebar on the left. As you make changes, you’ll immediately see them reflected in the live preview of your blog:
You’ll usually be able to customize your:
- Primary navigation menu
- Header
- Blog layout
- Colors
- Fonts
- Etc.
Some WordPress themes also give you other ways to customize your theme – you can check out the theme’s documentation to learn more.
Step 6: Write Your First Blog Post
There are still a few more housekeeping steps that you’ll probably want to perform, but at this point, you’re ready to publish your first blog post.
To do that, go to Posts → Add New in your WordPress dashboard. That will launch the WordPress block editor, which is where you’ll add content and format your blog post.
To add text to your post, all you need to do is click in the text editor and start typing. If you want to add other types of content, you can click the plus icon to open the block inserter:

Blocks let you add elements like:
- Headings to divide your post
- Images
- Videos
- Buttons
- Embedded Tweets
- Etc.
Blocks can also help you control the layout of your post. For example, you can use blocks to create multi-column layouts and add dividers.
We recommend exploring all of the blocks as they give you a lot of flexibility. You can also add new blocks using plugins, which we’ll talk about in the next section.
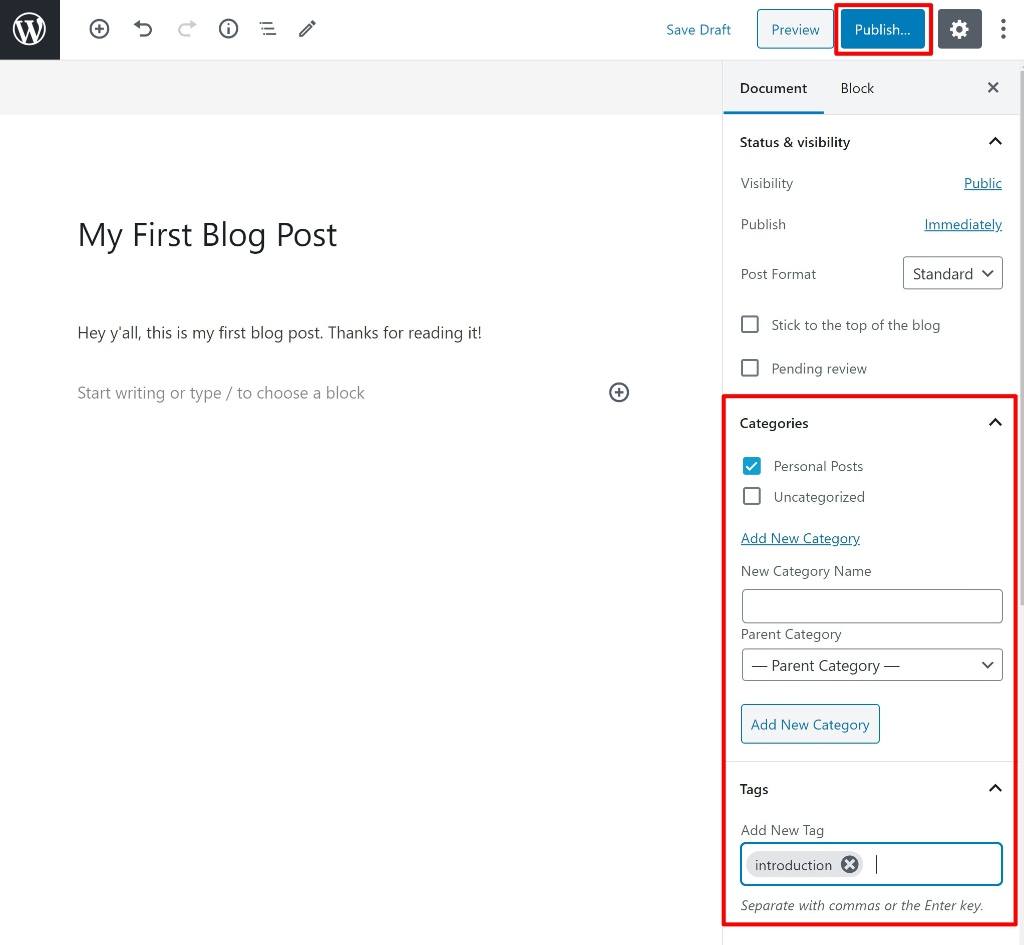
Finally, to organize your blog post, you can add Categories and Tags in the sidebar.
Once you’re happy with how everything looks, click on the Publish button to make your post live:
Now, let’s cover one more important aspect of setting up your blog…
Step 7: Extend Your Blog With Plugins
Whereas themes control how your blog looks, plugins help you add new functionality to your blog.
For example, if you want to add a contact form for readers to get in touch with you, you’ll need to use a plugin for that. Plugins can also make big changes, like adding an eCommerce store to your blog (this is great if you want to sell merch in the future, but you probably don’t need to add it right now).
We can divide plugins into two main categories:
- Must-have plugins – these are plugins that all blogs need, no matter what they’re about. Basically, you should install these plugins no matter what.
- Niche-specific plugins – these are plugins that only apply to your specific niche. For example, if you have a food blog, you might want a plugin that helps you display your recipes. You’ll need to search out these plugins yourself.
Must-Have Plugins for WordPress Blogs
Here are some of the must-have plugins for all blogs:
- SEO plugin – a search engine optimization (SEO) plugin helps you optimize your site to rank in Google. Rank Math is an excellent free option for beginners. Yoast SEO is also quite popular and free. Either plugin is fine.
- Speed optimization – it’s important to make your blog load fast and plugins can help you do that. For the best overall option, you can purchase the WP Rocket plugin. Or, for a good free option, you can use the WP-Optimize plugin.
- Contact form – every blog needs a contact form. Here, Simple Basic Contact Form is an excellent free option.
- Optin form – for building a powerful email list. Optin Forms is an excellent free mailing list option for WordPress.
- Anti-spam – blogs get a lot of comment spam. To automatically block most spam, you can use the free Akismet plugin.
Beyond the five plugins above, there are also some plugins that, while not absolute must-haves, can benefit most blogs.
First off, you can consider a WordPress page builder plugin. These plugins let you design your blog posts and pages using a visual, drag-and-drop editor. This is great if you want more control over how your content looks but don’t have any technical knowledge.
A good free option here is Elementor. You can also upgrade to Elementor Pro for more features, like the ability to create popups (read our Elementor Pro review if you want to learn more).
Most blogs could also benefit from a social sharing plugin to encourage your readers to share your content on social media. The free Kiwi Social Share plugin is a great option here.
Where to Find Niche-Specific WordPress Plugins
Here are some good ways to find niche-specific plugins for your blog:
- Search for free plugins at WordPress.org – this is the official free plugin directory. As of January 2022, you’ll find over 59,800 free plugins.
- Browse our plugin roundups – we also make lists of the best plugins for specific uses. For example, the best contact form plugins or email list building plugins.
- Search for premium plugins at CodeCanyon – CodeCanyon is a popular premium plugin marketplace from the same company that makes the ThemeForest marketplace.
- Use Google – Google can also be a great resource for plugins. The same advice applies as with themes – only use plugins from reputable sources and don’t download them from sketchy websites.
How to Install a WordPress Plugin
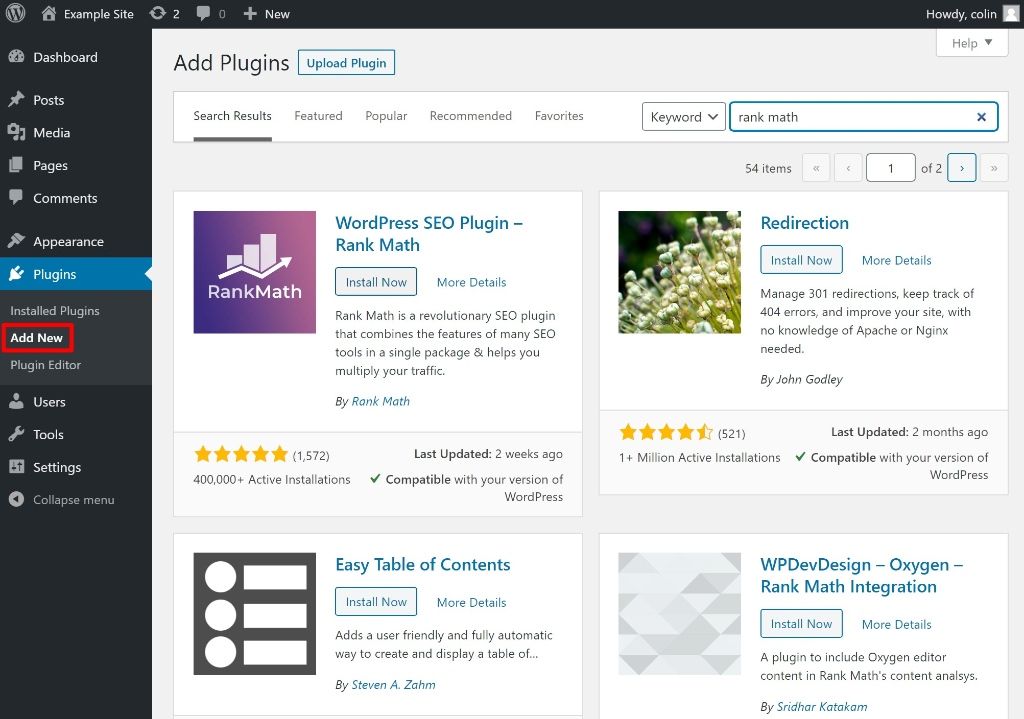
To install WordPress plugins, go to Plugins → Add New:
- If you found a free plugin at WordPress.org, you can install it by searching for it.
- If you purchased a premium plugin, you can upload the plugin’s zip file by clicking the Upload Plugin button.
Once you install a plugin, most plugins add their own settings areas in the WordPress dashboard sidebar. You can use these areas to configure each plugin.
Step 8: Get Traffic to Your Blog
At this point, you’re ready to make your blog public and start attracting visitors. Remember, Bluehost makes your site private by default, but you can make it public by going to the Bluehost area in your WordPress dashboard and clicking the Launch your site button.
Getting traffic to your blog requires a whole post of its own, but there are three basic strategies that most new bloggers use to get traffic (though these are not the only ways):
- Search engine optimization (SEO) – you optimize your blog posts to rank in Google. When people search for topics that you blog about, they can find your site.
- Social media – you share your content on social media and/or encourage other people to share it (with the ultimate goal being to go viral or at least reach new people).
- Referral – you get other websites in your niche to link to you through partnerships, guest posting, or just generally writing awesome content that they want to share with their readers.
As your blog grows, you might also get into paid promotion, like using Facebook Ads to boost your content on social media. That can be tough to do at the beginning without an advertising budget, though.
Here, we’ll link you out to some good starter guides to begin leveling up your knowledge:
- Mangools’s SEO for beginner’s guide
- How to build a social media strategy
- How to start guest blogging
Step 9: Monetize Your Blog
Once you start getting some traffic, you’re ready to monetize your blog…if that’s your goal. Of course, you don’t have to monetize it if you don’t want to, but there are plenty of unobtrusive ways to make money from a blog that let you earn an income without negatively affecting your readers’ experiences.
For bloggers, some of the most popular ways to make money are:
- Affiliate marketing – you earn a commission whenever someone purchases a product that you recommend (after clicking your special referral link).
- Display ads – you can display banner ads, either using a service like AdSense or by working directly with advertisers.
- Sponsored posts – brands sponsor a post on your blog (just make sure to disclose that you’re being paid for the post – not only does this build trust, but it’s also required in many countries).
Further down the road, you can also consider other monetization strategies like:
- Merch – some blogs do well selling branded clothing or other merch. You can add a store to your blog with an eCommerce plugin.
- Online courses – many bloggers have moved into selling premium course content. You can add online courses to your blog using an LMS plugin.
- eBooks/digital products – you can sell information products, like an eBook.
- Services – you can also offer services around your niche. For example, if you blog about design, you could use your blog as a way to market your design services.
Wrapping Up
Starting a blog doesn’t have to be difficult, expensive, and only for the tech-savvy. With Bluehost you can have a blog site up and running in less than 30 minutes.
If you’ve followed all the steps in this guide, you’re well on your way to building a successful blog.
Got a question about starting a WordPress blog? Let me know it the comments below and I’ll do my best to help you out!